

How To Clean Cat Ears With Solution
Ears are one area of your cat's body that often get forgotten when it comes to grooming. Learn how to clean a cat's ears safely and keep your cat healthy and happy. Cats are adept self-groomers and depending on their fur type and diet, might not require a lot of intervention from you to keep them clean and healthy when it comes to their self-care routines. However, there are a few jobs that they just can't do on their own, like cleaning their ears. Ear cleaning may not be the first job that comes to mind when you think about grooming your cat at home but can be easily incorporated into their grooming routine. Your cat's ears may look dirty before your cleaning, but the skin should be free of abrasions, inflammation, and irritation. Excessive scratching, pain when touched, or funky smells are also signs that the problem is more than just a little bit of ear wax. Here are a few common ear issues to be on the look out for: These teeny tiny pests can be very irritating for your cat. They are drawn to the warm, dark areas of the ear canal and they thrive on a diet of dead skin cells. Unchecked, ear mites can drive your cat crazy, causing her to scratch and shake to the point of injury. Mites are microscopic, so you can't see them like you can fleas or ticks, but they do leave behind debris that is typically easy to notice. Unlike typical ear wax and debris, ear mites leave behind debris that looks like small flecks of dirt. Think coffee grinds or black sand. Treating ear mites isn't difficult, but the earlier you catch them the better. Over-the-counter ear mite treatments can be purchased from your local pet store or from your vet's office. Severe infestations can be harder to treat, and checking in with your vet might be the safest solution. If your cat's itchy ears are accompanied by a funky smell, then you might be dealing with a yeast issue. A common symptom of an allergic or digestive reaction, yeast, a fungus, thrives in dark, warm, and moist areas, like the deep crevices in the ear canal. Yeast problems can be tough to get rid of, though, so although ear cleanings can help, they are just a band-aid for the larger issue. You must determine what is causing the yeast, whether it be food or environmental allergies, or poor digestion. Your vet can be a great resource for solving this issue. They can help you make changes to your pet's diet, environment, and overall health that will solve the underlying issue that allows yeast to thrive. A small cut or wound can become a problem, especially if your cat is fussing over the injury. Their natural grooming routines are meant to help prevent infection, but scratching and licking can irritate the skin around the wound causing it to worsen. Check for abrasions on the skin that may be irritating your cat and treat them with disinfectants, like Thrive Silver Shield, or other wound treatments. It's best to completely heal the injuries before resuming your cat's regular ear cleaning routines. Once you've ruled out these external factors, you can get back to a consistent grooming routine to keep your pet healthy. Unlike dogs, who need more frequent grooming and maintenance , cats typically don't need their ears cleaned more often than once per month., if that. Cleaning a cat's ears should be done on an as needed basis. The frequency of cleanings can be dependent on external factors like environment and diet even or health issues , like allergies . Even the shape of their ears and their genetics can affect how quickly gunk and bacteria build up in their ears. It's best to check their ears weekly for dirt, wax, and irritation . This will be the best indicator as to whether they need a cleaning. Try not to clean your cat's ears too often unless it's necessary or recommended by a vet. Here are some signs that your cat might need their ears cleaned: Caution: If you see open sores, bleeding, blisters, puss, or swelling, you should contact your vet immediately. Thes e could indicate infection and need to be addressed quickly to prevent the issue form getting worse. Ear cleaning solutions can sting if used on open wounds, so ask your vet when you can clean their ears after the infection has been remedied. Another good time to clean your cat's ears is before and after a flea , tick , or mite treatment. Cleaning their ears before and after can clean out debris and bacteria left behind by pests. Just like bathin g and brushing, over grooming your cat's ears can lead to some unintended consequences. Frequent and unneeded cleanings can dry out the sensitive skin in their ears which can cause irritation , which kind of defeats the purpose. Some cats don't mind being pampered, while others are adamantly opposed to a kitty spa day. How you groom your cat will depend on both yours and their levels of comfort with the grooming process. If you've never cleaned your cat's ears before, or if you cat is a bit prickly when it comes to being fussed with, then make sure you read through the following steps to cleaning your cat's ears and the tools that you'll need to do it safely and correctly . Before we break down the steps and tricks to cleaning a cat's ears, you're going to want to make sure that you have the right tools for the job. Here's a list of the things that we recommend you have on hand to clean a cat's ears: Even cats who are familiar with a variety of grooming practices can be uncomfortable with the experience. Try to keep your grooming routines to a calm, quiet area of the house where there are no distractions, like other people or pets. This will help keep you and your cat more relaxed and make the process that much easier. Slowly squeeze the cleaner directly into the ear canal. The faster you squeeze the cleaner into her ear, the more likely your cat will be startled, so go for a slow but steady stream. You want enough liquid that the ear canal is partially filled (less than h alf full). This will allow the cleaner to get into the deep crevices in their ear canal and loosen debris and wax that has built up. Small folds and crevices in the upper ear are most likely to collect debris, so use the pads to try and wipe these areas clean. Depending on how filthy her ears are, you may need to change pads if the first one becomes soiled quickly. You may have read these instructions and thought, "There is no way my cat would tolerate this!" Don't worry. We know that an ear cleaning isn't exactly a natural feeling for your cat and their response may be less than enthusiastic. Fortunately, we have a few tricks to help make the process a little easier and safer for you and your cat. If your cat is nervous , or is showing any signs of aggression, a good technique for keeping them still and helping them stay calm is called the P urrito . Like swaddling a baby, the P urrito technique involves snuggly wrapping your cat in a towel to limit their movement while keeping them safe . Here's a quick breakdown of the P urrito wrap technique: Ear cleaning solution is natural ly a little colder than room temperature. Before you use the liquid, hold the bottle in your hands for a few minutes to help warm it up a bit. You don't want it to be hot, so don't microwave or try to heat up the liquid beyond your body temperature. Th e more appealing temperature will make the cleaner less shocking to your cat when you put it in her ear. Any extra set of hands is helpful if your cat is extra wiggly. Having a partner to pet your cat or hold her can help keep her calm and allow you to work quicker. Try not to over crowd her, though. Only use a partner if necessary, and make sure your accomplice is someone who your cat is familiar and comfortable with. Pick an are a that is easy to clean. Cleaning your cat's ears in an empty bathtub or even just in the bathroom can help to minimize the mess and will be much easier to clean up when you are all finished. When your cat shakes, close your eyes and mouth, or turn your head away. Many c leaners are not safe to ingest and can cause irritation if it gets in your eyes. Keep yourself safe. To further avoid splatter and minimize clean-up, try tipping her head down slightly before you let her shake. Allow some of the liquid to drain out onto one of your towels. She'll still want to shake her head, but there will be much less liquid flying around when she does. It's hard to know what kind of reaction your will get from your cat. If this is your cat's first ear cleaning, then she may g e t upset . If your cat is getting overwhelmed by the experience, then it's time to take a moment to relax. It could take multiple tries befor e your cat gets the hang of it, so don't force it. Take your time and take brea ks as needed to help keep your cat calm. Don't forget to have treats, food, or even toys on hand to reward your pretty kitty every step of the way. Did you find our tips helpful? Let us know your successes and struggles in the comments below! Signs of a Bigger Problem
 Routine ear cleaning is important for getting rid of ear wax, debris, and bacteria that can lead to irritation, but it's also a great way to catch other issues. Just like any other grooming routine, you can take the opportunity to do a visual check of the ear and look for anything out of the norm.
 Ear Mites
Yeast
Injury

How Often Should You Clean a Cat's Ears?
Preparations for Cleaning a Cat's Ears
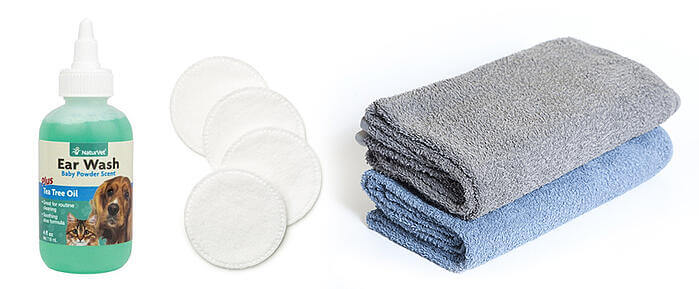
Tools for Cleaning a Cat's Ears
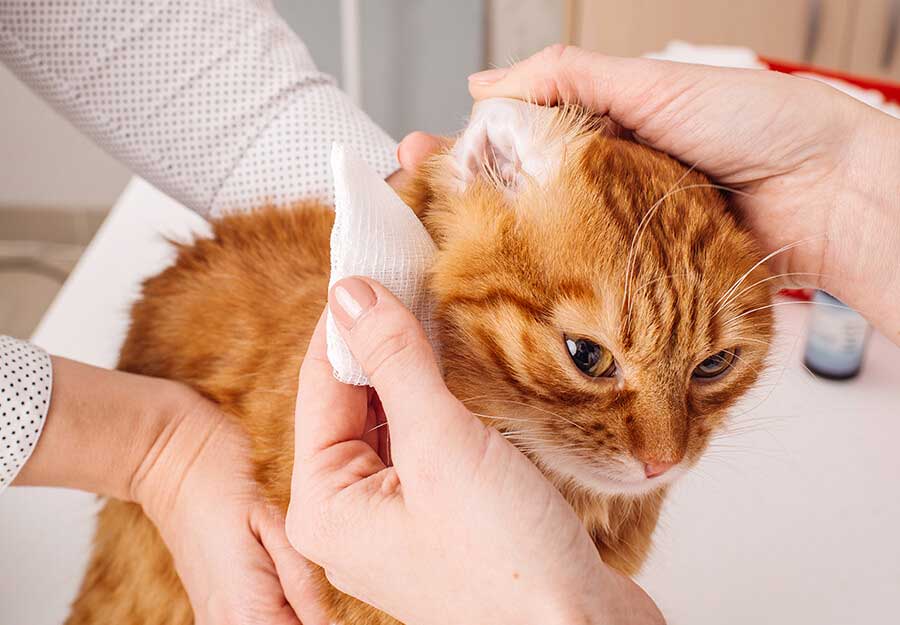
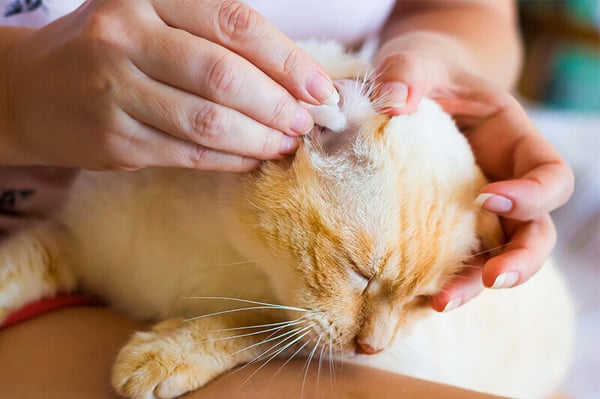
How to Clean a Cat's Ears in 10 Simple Steps


Tips for Cleaning a Cat's Ears
The Purrito Technique

Body Temperature Cleaner
A Helping Hand
The Clean-up
Avoid the splatter
Take a Breather
How To Clean Cat Ears With Solution
Source: https://blog.homesalive.ca/cat-blog/how-to-clean-a-cats-ears
Posted by: munozfrapter.blogspot.com
0 Response to "How To Clean Cat Ears With Solution"
Post a Comment